6年前に書いたこちらの記事のSONY A-1825-588-A XLRアダプターの分解方法の質問を頂きましたので記載しておきます。
※基本的に、SONY製のマイクマウントがついているXLRアダプターの分解方法は、同じはず。
This section describes about disassembly for SONY A-1825-588-A XLR adapter.
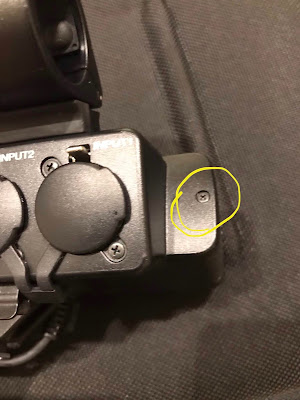
1)XLRアダプター右側前方部のスクリュー1個を外す。
Remove the x1 screw from the right panel.
2)XLRアダプターボトム部のスクリュー2個を外す。
Remove the x2 screws from the bottom panel.
3)マイクマウントの底部にあるスクリュー2個を外す。
Remove the x2 screws from the bottom of microphone mount,
4)マイクマウントを取り去る。マイクマウントを止めていたスクリュー穴はこんな感じ。
The microphone mount is fixed by these screws. The location of screws is shown.
5)その2つのネジ穴の中央にあるスクリュー1箇所を外せば、右側パネルが外れます。
Remove the 1x screw from the center of screws that fixed the microphone mount.
You can remove the right panel of XLR adapter.
6)右側パネルを固定してたスクリューの位置。
The location of screws that fixed the right panel of XLR adapter is shown.


コメント